Showing posts with label Makes. Show all posts

Friday, 9 March 2012

Mother's Day Doings......# Heartfelt Brooches x


Following on from the last post of  MOTHER'S DAY DOINGS......

If you have a spare half hour, dig out your fabric stash, and have a go at one of these brooches. I can't claim to have discovered these myself, oh no, a lovely pal did show me how to make these, one fabby giggly night at a craft evening ( she does those, once a month )....and have been meaning to make one for  the Mummy and Mummy in law ever since.


YOU WILL NEED:

Approx 13" x 1.5" ( for the small brooch ) of fabric
Approx 19" x 3" ( for the large brooch ) of fabric
Cotton.
Scissors.
Other small scraps of fabric/felt.
Vintage buttons.
Brooch backs.

# brooch backs found at craft or haberdashery shops in packs.....ever so useful to have some about the house.

Ready? let's go......

Find a suitable fabric for your brooch. If you are making it for someone else, bear in mind your choice/taste may be different to theirs. I also used some ticking - a sample I was thinking of using for curtains. If you have a favourite top that is ripped or ruined you could easily use that.

Measure, and cut your fabric length....then if you fancy a bit of fringing , I find now is the easyiest time to do that. Simply pull the threads, one by one, away from the edge which will eventually be the outside of the brooch. Keep going until you find a thickness you like.....( tis very much down to you, how thick or fine you fancy it )


See? Still with me? Ok.......next you will need to sew a simple running stitch along the other edge of the fabric ( this is about to be the middle of your brooch ) all the way to the end......then pull tight to gather the fabric in a ruffled fashion. Secure with a few knots and you should now have, what looks like the beginnings of your brooch.


Now it's time to cut some small circles ( I used cotton spool ends! )...and find a favourite button too.....then sew these together and add to the brooch with a few stitches.


Next is the back.....another small circle will hide all the stitches and messy middle...and is also the place to sew on your brooch back.


 Are you finished?!!!!! Me too............ aren't they the sweetest? Again I think children could do these, and you could always layer up the fabric too.

These will be going into the Mother's Day Hamper ...along with the bath soaks, and a few more makes and gifts in the next few days.

B.T.W how delicious is that feedsack material??????? I might keep that one actually......is that naughty?! 


Happy Brooch making xxxx

Thursday, 8 March 2012

Mother's Day Doings.......# Bath Soaks x

I thought, with Mother's day looming upon us, I might share a few D.I.Y crafts, makes, ideas for those lovely ladies in our lives. To say thank you, I love you, you are special, wonderful, and perfect.

My thoughts are this. Lovely thoughtful inexpensive gifts.

So this is my first make.
A pamper/relax/mummy moment.


ROSEMARY AND CHAMOMILE BATH SOAK.

You will need:

One large sprig of fresh Rosemary.
One handful of dried Chamomile.
One cup of porridge oats.
A large square of muslin.
Length of string.
Tag.
Ribbon.
Scissors.


# Dried chamomile flowers can be found in your nearest health shop, or online. ( or perhaps you are super fab and have some dried flowers you can use from your own garden...lavender would also do. )
# Cheap muslin can be found at most fabric shops.


Righty ho lovelies, this is soooo quick and easy...blink and it's done.


 Mix your oats and chamomile together and add to the middle of your fabric square.

Pop on top your rosemary sprig.

Gather the corners of your fabric together, to make a little bag, and tie with your string. ( I have left a loop on my string so that my Mummy can dangle her bath soak from the taps......)

Write a little tag, declaring your bath soak, and easy instructions.....

DONE!


Wouldn't you just love one of these, made with love?!
Super easy for children o do too.....perfect presents also for Granny.
And already smells amazing...might just make one up for me......


So over the next week or so, I'll be bringing you more ideas........look out.

xxx

Thursday, 9 February 2012

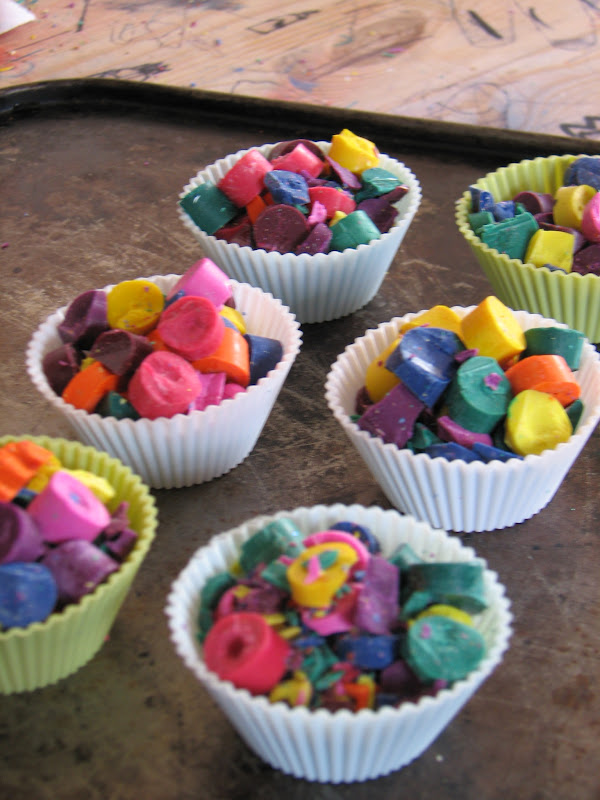
Wax crayon fun tutorial.......


All my blog posts seem to be for the kids this week. With half term holidays coming up I have a quick little craft you can do with them.
Making your own shaped crayons are all over the net at the mo, pintrest, blogs, and I thought it was time for us to give it a go.

All you need are some wax crayons ( which any house with little peeps will have, try and gather up all the broken pieces)......as many colours as you like.


Ask the kiddies to take off the paper wrapping.

Then we used a child friendly knife ( which worked to a certain extent )....you will have to find a sharp knife to finish off ( adult only of course! )...and cut up the crayons into small chunks. The kids can snap some of the crayons themselves.


Then finding a cake tin, or like us, use some silicone moulds and fill with the shards of wax crayons. Even using all the fine flaky stuff......
My bumblebee's wanted multi coloured crayons, but you could experiment with different tones....pinks, reds, and then add something like a green to them.....


Oooh top tip, try not to use many/if at all browns or blacks if you want fun colours, as they tend to take over......and no-one wants a sludgy brown crayon!


Pop into an oven for about 15mins on gas 5/190 c................
Open a window when taking them out of the oven......let cool, then pop out of the mould/tin.........


A fab way of using all those wayward crayons.....
have fun!

Friday, 3 February 2012

Valentine teacup tutorial.......x


I can't claim this idea totally as my own. I first saw something similar HERE at A Beautiful Mess and my thoughts immediately went to a teacup. Firstly, I get a little bit grumpy, when on a thrifting mission,  at a car boot, or charity shop I can't find any cute teacups and saucers. Only rubbishy crappy ones...booooooooo.

So, one day I picked up a few crappy teacups and saucers, and told them " one day I will make you beautiful, I promise"......


And yesterday was their day.

VALENTINE CUPS.

YOU NEED.......

crappy teacup and saucer.
mod podge.
brush.
red paint.
lots of red/pink glitter.
a romantic heart.


I used a little of my Annie Sloan red paint to cover the teacup ( my saucer was already red)....this paint is expensive, but as I had it and knew I would only need a little bit, I thought yup lets do it. I guess you could mix a bit of P.V.A or mod podge in with a red tester pot?

Wait for them to dry.


Now for the messy part.....yeahhhhhhhhh.
You will have to work in sections, as it is quite fiddly, and you want to get maximum glitter coverage.
You might want to squirt some of your mod podge into a jar to use ( it will be contaminated with glitter, you don't want all your podge messed up with glitter )
Brush on some mod podge then sprinkle your glitter on. As easy as that........
Keep going, you might find you need to let it dry a while, so you can handle the saucer/ cup to get in the tricky bits.
Once covered it NEEDS to dry out completely, don't get too over excited and start glazing before you are meant to, it will only end in tears. I have warned you.


Now, brush on a lovely layer of your podge.......and allow to dry clear in a sunny spot. You will find 2 coats should suffice.This makes sure you won't end up with rogue glitter.

These are seriously b.e.a.u.t.i.f.u.l.........


Look at them sparkle......

Fill with valentines treats, obvs you won't be able to drink from you teacup, that would be a crazy thought, but you will be able to add some glitzy romance to your valentine's day, without breaking the bank and succumbing to the lure of the card and chocolate companies.

I think I'm going to use mine ( after valentine's) to hold all my rings in....pwetty eh?

Oh and you know what else? SOMEONE really needs to have a Wizard Of Oz party and use these as a table decoration........

Happy glittering.....Link me up lovelies if you do decide to make one.........

Spread the luuuurve xxxxxxxx


Friday, 9 December 2011

A win and a "how to"...........


I was a winner!!!!! The lovely Ellie at X JELLYJAM X had a Christmassy giveaway, and I won!!!!!! Am feeling super smug with my new stocking ( for the Q ) and keep admiring it from afar........soooo beautiful, and well made......THANKYOU JELLY JAM!!!!!!!!  Pop over and see her other bits, as she uses the most fantastic vintage fabrics.


This year, it's all about a D.I.Y Christmas for me. I also like the girls to get involved with decorations and wot not. I thought you might like to see how the tissue paper pom pom decorations we made last week work. ( we also made them for little bumblebee's birthday party....so very useful! )


You just need lots of sheets of tissue paper some garden wire, scissors and string.

We found around 10 sheets of tissue paper worked best to create a full pom pom.

Place 10 sheets of your desired colour on top of one another.


 tissue bow is stage 4.......


big bumblebee nearly at the end of her folding.

1. You are working along the longest length of the paper. At one end, start folding a strip about 2 inches, then turn over and repeat on the other side, and so on and so on until you come to the end of the sheets. ( try to be as precise as you can, however if children are having a go, don't be too hard on them!!! Just let them go with it....)

You should end up with a fat strip of folded tissue paper concertina styleeeee.


Make sense so far??????

2. Now wind a length of garden wire around the middle of your strip. ( find this by folding in half ). Keep it tight, as this holds it all together.
3. Then attach your desired length of string to the wire.

If you want, now is the time to shape the ends of the strips, I quite like them plain, but you could zig-zag, waves them if you wanted too.

I found hanging the pom pom up at this point helps with the shaping.
You are nearly there!


4. Fan out both sides of the soon to be pom pom. Start on one side by GENTLY pulling apart the sheets of paper, working from one end to the other....and so on and so on.......

Until you end up with a nearly pom pom....all you do is fiddle and titivate the sheets into looking like they don't part in the middle, like they are continuous layers......

That is your pompom Done! Ready to make more?!!!!


I think there are tutorials on the web about these, where people measure their strips, use craft knives and it is all very exact and precise....I couldn't be bothered with all that!

Happy pom-pomming!!!
xx


Tuesday, 26 July 2011

Homemade wrapping paper.............x


Wrapping presents, for me, is up there with the smell of nutmeg, flower meadows, a crackling fire, and children's giggles.....

I suppose you can spend £5 on a lovely roll of thick wrapping paper, beautifully printed......BUT I prefer brown paper. We jazz it up with pretty ribbons and tags, patterned tape, potato printing, and the bumblebee's love to use their colouring pens to draw pictures relevant to the receiver.....


Using scrap pieces of paper, the girls set to making their own wrapping paper this morning. I would be thrilled to receive such a piece of artwork!!!!!


F.Y.I........left is a toadstool and right is Cath Kidston's house! I love their little imaginations......

xxxxx

Friday, 15 April 2011

Colourful sparkly eggs......................x

There have been many activities going on here this week. I am lucky that my girls enjoy a good crafting session, I am not one for containing the mess, or asking them to be careful with the glue.....


Messy play is messy play isn't it??????? Free -range, self expression, no crafting boundaries........I'm a helicopter parent......you see when I was little, we grew up in a higgledy piggledy cottage, I think there was always glitter glue smeared on the kitchen table,  and I was allowed to paint my own room, I painted a jungle scene on the wall with tigers, parrots and stuffs! I know this is a bit out there, but that was my childhood....and I loved it..and I was very lucky and blessed I know.


B.T.W sorry about the fluffy pictures today, they have all been taken on my phone....( can't work out how to clear the memory of the normal camera......awww Mr.Q where are youuuu?!! )


P.S YES!!!!! That is the new painted window...all finished! Will post properly on this very very soon!!!


Easter making and doing........dying the eggs was really very easy, and soooo satisfying!! here's what you do...

You need :

Hot water
Selection of food dyes.
White vinegar.
Eggs that have been blown.

Use one cup of hot water for each egg. Add one tablespoon of vinegar, and a teaspoon of dye. Mix and add your egg, the longer it is in the water, the brighter the colour will be!

See! Super easy peasy!

We tried to convince Mr.Q that the chickens had laid colourful sparkly eggs, but he wasn't fooled! We'll get him next time.....


A little sneak peak of a sewing project I have been doing this week for littlest Bumblebee...now for big bumblebee's........all will be revealed I promise!..........................ooooh what could it be???!

Happy Friday to you all.......have a super day lovelies, what ever you are doing. Oooh can we all send some love, hugs and good luck to all the runners for the Marathon this weekend? My friend Caroline is running for her first ever time...wishing you luck lovely....will keep an eye out for you!

P.S How many Ooooh in this post today?!!! ooooh.....

xxx